pORTABLE OBSERVATORY
|
Observing Tent
Unit Finder
Hacks
Alt‑Az Mount
Bino Mount
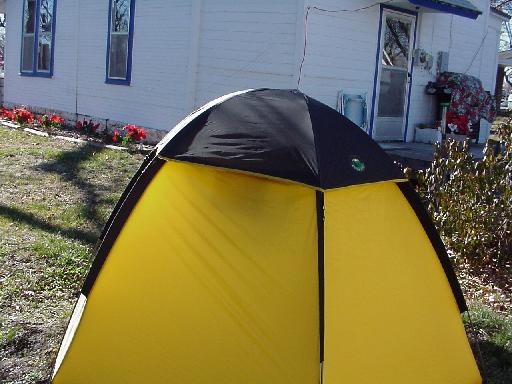
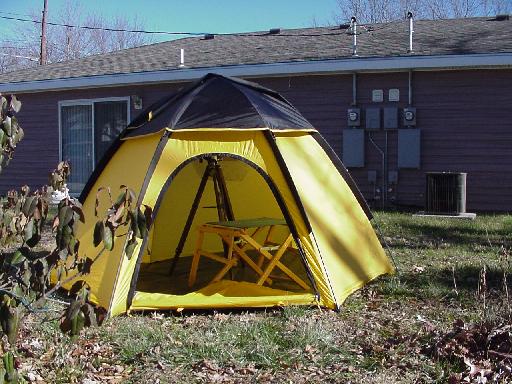
No home would be complete without an observatory! For about $30, you can make your own portable observatory that can be set up and taken down within minutes. I used an Ozark Trails 2-3 Man Dome Tent, which can be purchased from Wal-Mart for about $30-$35. It has over a foot more headroom (total of 4' 4") for only $10-$15 more than their 1-2 Man Dome Tent
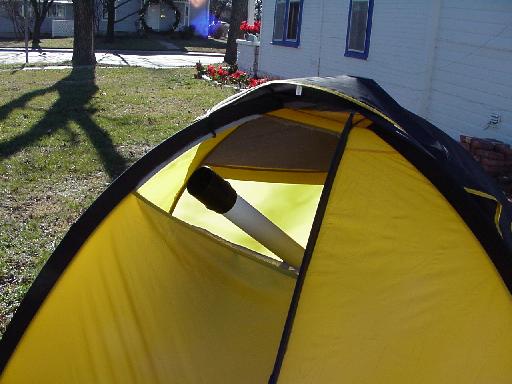
WHY DO I NEED AN OBSERVATORY?Several years ago, I (not knowing any better) purchased a 60mm refractor (a Kmart Focus model) at a yard sale. The main tube has pretty good optics and the 20mm eyepiece (35x magnification) isn't too bad, but the other eyepieces are only fair at best, and the wooden mount is pretty wobbly in even the slightest of breezes. The most important reason, however, was light pollution in my backyard. I live in a small town, but live on a highway (with a lot of streetlights) and across the street from a county hospital (lots of light pollution there!). Even so, by cupping my hands around my eyes, on good nights of seeing, I can still make out the Milky Way, so the skies are still fairly dark. I had found an article on the internet about how to make a light blocker out of PVC pipe and heavy-ply trash bags, but with the light coming from all around me, I would need about a dozen of them, and the amount of time needed putting all of those up would seriously cut into my observing time. Then I came across an ad in a popular astronomy magazine for a tent that was designed especially for observing. It had everything you would need in an observatory: a rotating dome, a zippered viewing window, and even a second room for sleeping or setting up a work area. The catch was that it would take up half of my yard and cost over $300! Surely there was a cheaper solution... Then, when browsing in Wal-Mart one day, I looked at the dome tents, and noticed that a few of the models had mesh windows near the top of the tent. I found the 2-3 Man Dome Tent to be the best buy for compactness and headroom. PREPARING THE TENTIt only takes a few minutes to prepare the tent for use as an observatory. First, you will need to set up the tent, per the instructions provided with the tent. The tent I'm using requires about 7 square feet of space: not a problem for most yards or patios. Next, you will notice that this particular model of tent has three "windows" which are covered with a nylon mesh. The tightly-woven mesh is great for keeping out mosquitos, but it isn't very easy to see through with a telescope, so the nylon will have to be removed, leaving three open windows. The dome cover will keep rain from getting into these windows. On my tent, I have only cut out the sides and top of the mesh, allowing the mesh to hang from the bottom of the window. I may decide later to add velcro strips to the mesh screens, which would effectively let me "close" the windows when they're not in use, to keep out unwanted wind. Now, the tent is ready. Simply unfasten the two dome cover hooks from the window you wish to observe from, stick your scope out the window, and start enjoying the view! RESULTSI have found the tent to be an effective wind breaker, allowing my telescope to show steadier images. That, combined with the light glare reduction from nearby street lights, has allowed me to view things with my scope that I didn't think was possible before. For instance, on nights of good seeing, I can now make out all four of the main stars of the Trapezium in the Orion Nebula. Before, I was only able to make out the three brightest stars at best. Overall, I believe I can now see objects about a half-magnitude fainter than I was able to before using the observatory. Not a bad deal for $30! FUTURE IMPROVEMENTSIn the future, there are several minor modifications that can be done to enhance my observatory even further: First, as I mentioned earlier, I will probably affix velcro strips to the mesh screens to allow the windows to be closed again. Also, I would like to make the inside of the tent darker; either by painting the inside walls of the tent a flat black, or by attaching black cloth panels to the inside of the tent walls. The tent comes with one "pocket" underneath one of the windows inside the tent. This pocket is useful for storing things such as eyepieces, notepads, pencils, and even my eyeglasses (which I remove when viewing). Obviously, not all this stuff will fit in a single pocket, so sewing a few more seems like a good idea, not to mention saving precious tabletop space within the tent for larger charts, etc. I might someday also attach a battery-operated red light to the peak of the dome roof. The light would have to be pretty flat, because headroom is precious, and light enough that I wouldn't have to worry about it crashing down on me. For now, I'm using a pocket flashlight which incorporates several red LEDs. Do you have any ideas that you think would improve my observatory? I'd love to hear them! Just email me by clicking on my name at the bottom of this page. |